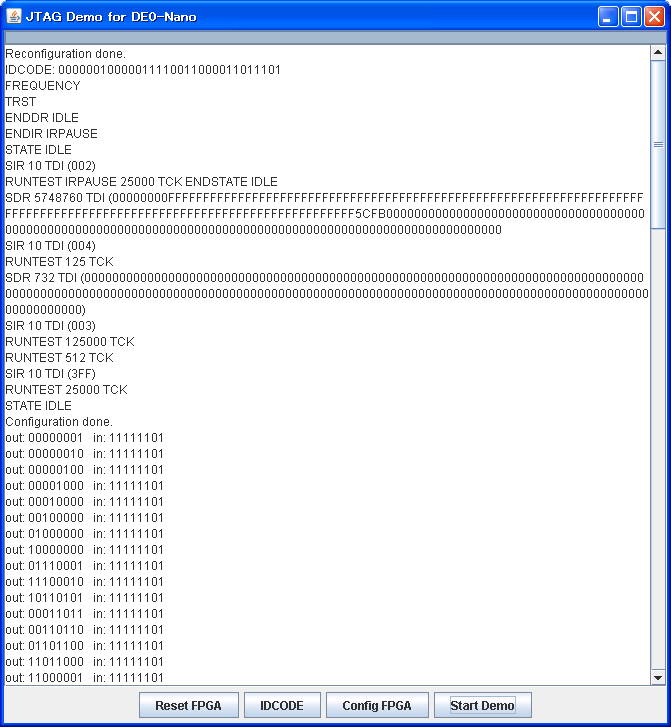
Wednesday, March 27, 2013JTAG Configuration by JavaTo drive the nail home, now let’s try configuration (rewriting the circuit) of FPGA by JTAG. Firstly, please have a try to download the Jar file (jtag_demo.jar) and execute while keeping DE0-Nano in connection with USB cable. This is supposed to be compatible to 64-bit environment, which is not tested yet though.
The above image shows the result of executing 4 commands of “Reset FPGA,” “IDCODE,” “Config FPGA” and “Start Demo” one after another, for example. “Reset FPGA” is a command to forcefully configure FPGA, and, in case of DE0-Nano, loads the circuit in the EPCS64 on the board. “IDCODE” is a command to read 32-bit IDCODE of the device “EP4CE22.” “Config FPGA” is to execute a SVF file and configure FPGA. The SVF player has only crucial minimal capabilities, while many other functions such as checking TDO are left out. The last “Start Demo” enables observing I/O data via JTAG communication demonstration (except changing speed and halting by pushing buttons) which appeared in the previous article. To tell you the truth, this command can work with no error even before configuration, but then the output data cast no impact on LED. As this operation requires complicated processing such as execution of SVF and GUI, it would be all the less readable to combine all processes into single Java code. Therefore, I split it into three parts, JTAG library and basic GUI (JTAG.java) as a relatively generic part, execution of SVF (SVFPlayer.java) and demo application (JTAG_Demo.java). With a split library, the demo application part has a very simple design. A button appears in display upon the creation of a JTAG.GUI class instance. While having to describe what you’d like to run in onClick() method, you have little need to write down raw data by write() method thanks to additional methods: state() method to transit JTAG state for SVF execution and shift() method for SHIFT_DR/SHIFT_IR. SVFPlayer class is a derived class of JTAG.GUI, which requires appointing button name and resource name of SVF as generation parameters.
import info.relm.JTAG;
import info.relm.SVFPlayer;
public class JTAG_Demo extends JTAG {
    public static void main(String[] args) {
        GUI.title("JTAG Demo for DE0-Nano");
        new GUI("Reset FPGA") {
            public void onClick() {
                reset();
                state("RESET", "IRSHIFT");
                shift(10, 0x1);
                state("IREXIT1", "IRUPDATE");
                text.append("Reconfiguration done.n");
            }
        };
        new GUI("IDCODE") {
            public void onClick() {
                reset();
                state("RESET", "IRSHIFT");
                shift(10, 0x6);
                state("IREXIT1", "DRSHIFT");
                readBytes(4, 0);
                text.append("IDCODE: " +
                    Long.toBinaryString(0xffffffff00000000L |
                    read(4)[0]).substring(32) + 'n');
            }
        };
        new SVFPlayer("Config FPGA", "jtag_led.svf");
        new GUI("Start Demo", "Stop Demo") {
            public void onClick() {
                reset();
                state("RESET", "IRSHIFT");
                shift(10, 0xe);
                state("IREXIT1", "DRSHIFT");
                shift(9, 0x100);
                state("DREXIT1", "DRSHIFT");
                flush();
                try {
                    for (int lfsr = 1; ; Thread.sleep(10)) {
                        readBytes(1, lfsr);
                        shift(1, 1);
                        state("DREXIT1", "DRSHIFT");
                        text.append("out: " +
                            Integer.toBinaryString(lfsr | 256).substring(1) +
                            "tin: " +
                            Integer.toBinaryString(read(1)[0] | 256).substring(1) +
                            'n');
                        if (((lfsr <<= 1) & 256) != 0) lfsr ^= 0x171;
                    }
                } catch (InterruptedException e) {}
                shift(9, 0x100);
                state("DREXIT1", "DRUPDATE");
            }
        };
    }
}
It enables FPGA configuration without setting up Quartus II. |
